
Running the NZRPOSN Report
The NZRPOSN generates a list of positions for a single organization or a range of organizations and may be printed or downloaded as a text file.
To print the NZRPOSN:
Banner reports can be printed only on a designated printer. This printer is a network printer, but it will have a designated Banner name. If you don’t have a Banner designated printer or don’t know the Banner name for the printer, see the instructions for downloading the report.
1. Enter the name of the Banner printer in the “Printer” field in Printer Control section of the form.

2. Enter the values for each parameter listed. (At the bottom of the Parameter Values section of the form, parameter definitions and value options are displayed.)
| Number | Parameters | Values |
|---|---|---|
| 01 | Parameters Values 01 Enter the report start date | 01-JUL-1993 (1) |
| 02 | Enter the report end date | 30-JUN-2xxx (2) |
| 03 | Enter the Start Org Code | XXXXXX (3) |
| 04 | Enter the End Org Code | YYYYYY (3) |
| 05 | Enter the Position Status | Leave blank |
| 06 | Sort Option 1 [Y/N] | N |
| 07 | Sort Option 2 [Y/N] | N |
| 08 | Sort Option 3 [Y/N] | Y |
| 09 | Position Code | % |
| 10 | Fund Code | 110100 (4) |
| 11 | Beginning Account | 51xxx (5) |
| 12 | Ending Account | 51xxx (5) |
| 13 | Fiscal Year | 2xxx (6) |
| 14 | NBBFISC Active Ind [Y/N] | Y |
| 15 | NBRPTOT Status | A |
| 16 | Include Program Codes | Leave blank |
| 17 | Exclude Program Codes | Leave blank |
| 18 | Include Predecessor Codes | Leave blank |
| 19 | Include Terminated Employees? | Enter “Y” or “N” (7) |
| 20 | Effective Date for Terms | See footnote 7 (8) |
| 21 | Create Download File | U |
| 22 | Include Vacant Positions | Enter “Y” or “N” (9) |
| 23 | Comment Options | Enter “Y” or “N” (10) |
Footnotes:
(1) The report start date should always be 01-JUL-1993.
(2) The report end date should always be the last day of the fiscal year (e.g., 30-JUN-2xxx).
(3) Enter the Banner alias (which may be different from the EAS org) for the org(s) for which data should be returned.
(4) The fund code for University operating funds (c-funds) is 110100. The corresponding fund code for the Medical Center is 210100.
(5) Enter the five-digit payroll account for which data should be returned (e.g., 51111, 51211, 51221, etc.).
(6) Enter the current fiscal year (e.g., 2012).
(7) Enter “Y” or “N” if terminated employees should be listed on the report. The report will bring back a list of current and terminated employees for each position as of the effective date entered in parameter 20.
(8) Enter the effective date for the terminations listed in parameter 19. If parameter 19 is “N”, leave parameter 20 blank.
(9) Enter “Y” or “N” if vacant positions should be included in the report. Vacant positions are usually included in the report.
(10) The position record may have comments attached to it pertaining to funding, temporary adjustments, leaves of absence, etc. Enter “Y” or “N” if the report should include comments.
3. After entering the last parameter value, click the “Save Parameter Set as” box (a check mark will appear in the box) and click the “Save” icon in the toolbar at the top of the page. A dialog box stating “Saving current parameter values as user level details” will appear; click “OK”. (When the NZRPOSN form is reopened, the parameters entered the last time the report was run will automatically populate.)
NZRPOSN Form

Once completed, the report will automatically print to the designated Banner printer. (NOTE: Due to the confidentiality of the information in the report, be sure to retrieve the report from the printer quickly, especially if the printer is not in the immediate vicinity of your office or workstation.)
To download the NZRPOSN:
1. Enter “NOPRINT” in the “Printer” field. Follow the steps and save the parameters as outlined above.
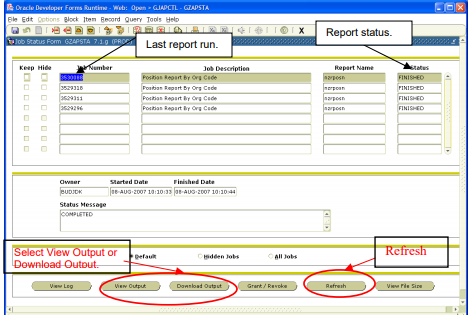
2. Click “Options” from the menu and select “Job Status Form [GZAPSTA]”.

3. The most current job will appear first on the screen. If the Status is “Running”, click the refresh button at the bottom of the screen until the Status is “Finished”.
4. Click “View Output” button at the bottom of the screen to access the download file. (Clicking the “Download Output” button is another way to access the download file.)
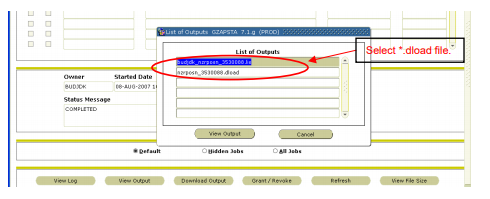
5. Two files will be in the dialog box as a List of Outputs—one with a *.lis extension, another with a *.dload extension. Select the *.dload file, and click “View Output”. The data will appear in another dialog box.
6. Save the file. The file will save as a *.txt file that can be opened and viewed in Excel.
7. To open the download file in Excel, open the *.txt file in Excel (making sure that All Files (*.*) is selected as the “Files of Type”. The Text Import Wizard will automatically launch.
8. Select “Delimited” as the file type, and click “Next”.

9. Select “Other” and enter the pipe symbol (|) (Shift key + the key under the Backspace button). Click “Next”, then “Finish”.
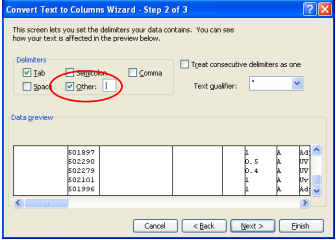
10. Your data is now parsed and can be more easily viewed. Save the file as an *.xls document.
Notes about downloading the NZRPOSN:
Be sure that the pop-up blocker is either disabled or will allow pop-ups from the Banner website. Otherwise, you will not be able to download the file.
The download does not include the headers that appear on the printed report. Your budget analyst can provide you with the headers upon request.
The download file does not include all of the data fields included on the printed report.